레이블이 embedded development인 게시물을 표시합니다. 모든 게시물 표시

2016년 8월 14일 일요일

mbed OS상에서의 physical web과 web bluetooth (Physical Web and Web Bluetooth on mbed OS)

IoT 개발자로서 마주치게 되는 가장 큰 의문은 '사용자가 어떻게 우리 디바이스를 사용할 수 있게 하지?' 이다. 최근 몇년간 이 문제를 해결하는 가장 일반적이고 표준적인 방법은 디바이스 전용 앱을 만드는 것이었다. 하지만 주변에 디바이스가 점점 많아지기 시작하면서 사용자들에게 '또 다른 전용 앱'을 설치하라고 하는게 점점 힘들어지고 있다. 물론 이건 사용자가 그곳에 당신의 디바이스가 있다는걸 알고 있다는 전제 하에서의 이야기이다...디바이스가 있는지 모른다면 저 질문 자체가 성립하지 않을것이다.

그러므로 주변에 있는 IoT 디바이스를 사용하게 하기 위한 더 편한 방법이 필요하게 된다. 단순히 디바이스를 조작하는 것 뿐 아니라 디바이스를 발견할 수 있어야만 한다. 이 두가지 문제를 해결하기 위해 구글은 안드로이드용 크롬 48부터 브라우져에 추가한 두가지 기능은 매우 흥미롭다.

먼저 Physical Web을 추가했는데 이 기능은 운영체제에 통합되어 주변의 블루투스 비콘을 보여준다. Eddystone-URL 프로토콜을 사용해 저가형 BLE 비콘을 가지고 URL을 브로드캐스트하는데 사용할 수 있게 해 주어 주변 디바이스와 상호작용을 할 수 있게 해 준다. 이것은 주차 미터의 결제 포털부터 새로운 장난감을 제어하는 웹 어플리케이션까지 다양한 곳에 적용할 수 있다. 이것만으로도 충분히 흥미롭지만 구글은 Web Bluetooth 지원도 추가해 웹 어플리케이션이 BLE 디바이스와 통신을 할 수 있게 해 주었다.

이 두 기능은 각각 그 자체로도 훌륭하지만, 두 기능을 통합하면 IoT 개발자에게 매우 유용한 기능을 제공해 준다.

1. 디바이스가 URL을 브로드캐스트 해서 주변에 있는 사용자가 디바이스를 발견할 수 있게 해 줌
2. 이 URL이 가르키는 곳에는 사용자가 디바이스를 컨트롤 할 수 있는 웹 앱이 있음

BOOM~! 이제 디바이스 발견 문제와 전용 앱 설치 문제를 해결했다. Physical world에서 디바이스를 발견하는것 부터 발견한 디바이스를 제어하는데 까지 몇초 내로 가능하다. 다음은 이 기능의 데모로 Parrot 드론을 발견하고 그것을 제어하는 비디오이다.


Eddystone beacons are non-connectable


하지만 임베디드 개발자 관점에서 코드를 작성하려고 하면 마주치게 되는 문제는 Eddystone 비콘도 '비콘'이라는 것이다. 비콘의 역할은 특정 위치에서 advertisement 패킷을 브로드캐스트 하는 것이다. 비콘 디바이스는 브로드캐스트만 수행하지 다른 디바이스가 비콘에 연결하는걸 허용하지 않는다. 그러므로 그 디바이스와 통신을 하기 위해 GATT로 연결할 수 없다. 문제를 더 복잡하게 만드는건 Eddystone 프로토콜에는 GATT 서비스 UUID 목록을  보내기 위한 공간이 없기 때문에 다른 어플리케이션이 디바이스가 가지고 있는 기능을 발견할 수 없다는 것이다. 이렇게 되면 사용성이 매우 제한되게 된다. 하지만 개발자로서 이 문제를 해결해 보자.

BLE examples repository에는 mbed OS에서 실행되는 훌륭한 Eddystone 라이브러리가 포함되어 있다. 최근 동료인 Andres Amaya Garcia가 이 라이브러리에 frame scheduling을 위한 몇가지 새로운 기능을 추가했다. 이 기능은 비콘이 URL과 telemetry 데이터를 둘 다 브로드캐스트 할 수 있도록 허용한다. 이는 한 비콘에서 서로 다른 advertisement 패키지를 보냄으로서 가능해졌다.

이 기능은 비콘이 Physical Web/Eddystone URL 비콘과, 연결할 수 있는(connectable) 블루투스 디바이스가 되길 바라는 우리들에게 딱 맞는 기능이다. 매 500ms마다 URL을 브로드캐스트 하고 그 500ms후에 일반 블루투스 프레임을 브로드캐스트 할 수 있다. 이 기능이 다음 라이브러리에 훌륭하게 포함되었다. 'eddystone' 폴더를 자신의 mbed OS 프로젝트 내의 source 폴더에 추가하고 나서 다음과 같이 라이브러리를 초기화 하면 된다.


#include "mbed-drivers/mbed.h"
#include "minar/minar.h"
#include "core-util/FunctionPointer.h"
#include "ble/BLE.h"
#include "eddystone/EddystoneService.h"

using namespace mbed::util;

// Eddystone URL
static const char defaultUrl[] = "https://control.me";
// Normal Beacon name
static char beaconName[] = "I'm a beacon!";
// Service UUIDs for the beacon
static uint16_t uuid16_list[] = { 0x8765 };

static const PowerLevels_t defaultAdvPowerLevels = {-47, -33, -21, -13};
static const PowerLevels_t radioPowerLevels      = {-30, -16, -4, 4};

void disconnectionCallback(const Gap::DisconnectionCallbackParams_t *params)
{
    BLE::Instance().gap().startAdvertising(); // restart advertising
}

void onBleInitError(BLE &ble, ble_error_t error)
{
    (void)ble;
    (void)error;
   /* Initialization error handling should go here */
}

void bleInitComplete(BLE::InitializationCompleteCallbackContext *params)
{
    BLE&        ble   = params->ble;
    ble_error_t error = params->error;

    if (error != BLE_ERROR_NONE) {
        onBleInitError(ble, error);
        return;
    }

    if (ble.getInstanceID() != BLE::DEFAULT_INSTANCE) {
        return;
    }

    ble.gap().onDisconnection(disconnectionCallback);

    // Set up Eddystone
    auto eddyServicePtr = new EddystoneService(ble, defaultAdvPowerLevels, radioPowerLevels, 0);
    eddyServicePtr->setURLData(defaultUrl);
    // The name of the beacon and the service list
    eddyServicePtr->setNormalFrameData(beaconName, strlen(beaconName), uuid16_list, sizeof(uuid16_list));

    // Every 500 ms. Eddystone URL, then Normal frame
    eddyServicePtr->setUIDFrameAdvertisingInterval(0);
    eddyServicePtr->setTLMFrameAdvertisingInterval(0);
    eddyServicePtr->setURLFrameAdvertisingInterval(500);
    eddyServicePtr->setNormalFrameAdvertisingInterval(500);

    eddyServicePtr->startBeaconService();
}

void app_start(int, char**) {
    BLE::Instance().init(bleInitComplete);
}

Seeing it all come together


모든것이 동작하는지 확인하려면 안드로이드 6 버젼 이상을 사용하는 안드로이드 폰이 필요하고 그 폰에 Chrome Dev를 설치해야 한다. 설치한 후에 chrome://flags#enable-physical-web 과 chrome://flags#enable-web-bluetooth 두가지 기능을 활성화 시켜야 한다.


주소창에 'chrome://flags#enable-physical-web'  을 입력한다.


Enable the Physical Web 항목을 선택한다.


Enable the Physical Web 항목을 'Enabled'로 바꿔주면 된다.


주소창에 'chrome://flags#enable-web-bluetooth' 를 입력한다.


Web Bluetooth 항목을 'Enabled'로 바꿔주면 된다. 


 두 항목을 활성화 시켰으면 아래쪽의 'Relaunch Now'버튼을 눌러 크롬을 재시작 해 준다.

이제 drawer를 아래로 내리면 주변의 Physical Web 비콘과 URL 목록을 보여준다.


'Pair'를 터치하면 커넥션이 연결되고 characteristic을 읽거나 쓸 수 있게 된다.


Physical Web URL을 통해 연결할 때는 페어링 스탭은 더 이상 필요하지 않다고 생각하지만 아직까지는 이 스탭이 필요하다.

Conclusion


이제 가능성은 무한하다. 디바이스와의 적절한 BLE 커넥션을 가지고 있으니 네이티브 안드로이드 앱에서처럼 characteristic을 원하는 대로 읽고 쓸 수 있다. 다음 단계로 넘어갈 준비가 된 사람들을 위해 가속도 센서값을 블루투스를 통해 전송하고 복수의 BLE 디바이스에서의 움직임을 그래프로 그리는 웹 앱 코드를 준비 해 놓았다. 소스코드는 github에서 찾아볼 수 있다.


2016년 8월 11일 목요일

BBC micro:bit - 영국의 코딩교육용 보드

영국의 국영방송사인 BBC에서 만든 코딩 교육용 보드로 31개 기관과의 파트너쉽으로 영국의 모든 11~12세 어린이에게 무료로 제공되었다. 파트너에는 Microsoft, Lancaster University, Farnell Element14, Nordic Semiconductor, NXP Semiconductor, ARM Holdings, Barclays, Python Software Foundation, Bluetooth SIG 등 이름만 들어도 알만한 쟁쟁한 업체들이 망라되어 있다.

가로 5cm, 세로 4cm로 일반적인 명함의 절반 크기이지만 매우 다양한 기능을 가지고 있다.


ARM Cortex M0 기반인 Nordic Semiconductor의 nRF51822 프로세서를 사용해 256KB flash memory, 16KB SRAM 뿐 아니고 BLE로 통신이 가능하다. 즉 안드로이드, 아이폰과 연동해 센서값을 보내거나, 스마트폰에서 이 보드를 직접 제어가 가능하다. 또한 USB 2.0 OTG 컨트롤러를 가지고 있어 USB로 컴퓨터와도 바로 통신이 가능하다. 센서로는 MMA8652 3축 가속도 센서와 MAG3110 3축 지자기 센서(디지털 컴파스)가 장착되어 있다.

웨어러블이나 스탠드얼론 동작을 위해 배터리 커넥터를 가지고 있어 AAA 배터리 팩을 장착해 전원을 공급해 줄 수 있다.

그리고 보드 앞면에 두개의 푸쉬버튼과 25개의 LED(5x5 array)를 가지고 있어 다양한 방법으로 사용자 입/출력이 가능하다.

Pinout은 다음과 같다.


소프트웨어 개발에는 이 보드가 처음부터 어린이들의 코딩 교육용으로 만들어 졌기 때문에 JavaScript를 사용하는 CodeKingdoms, Microsoft의 Blockly기반의 Block Editor, TouchDevelop같이 GUI기반으로 마우스 drag-n-drop 만으로 쉽게 프로그램을 만들 수 있는 툴 뿐 아니고 기존의 프로그래밍 언어 방식으로 작성할 수 있는  MicroPYthon이 있다.

* Code Kingdoms

 * Touch Develop

 * Block Editor

* MicroPython

또한 mbed-compliant이기 때문에 임베디드 환경에 익숙한 사람들은 기존의 mbed환경에서 프로그램을 개발할 수도 있다.


상세한 내용은 micro:bit 프로젝트 홈페이지(https://www.microbit.co.uk/)를 참고하면 된다.

현재 영국에서만 판매되고 있는데 온라인으로 주문하는데 해외배송에는 아무 문제가 없고 가격은 micro:bit 보드만인 경우 10.83 파운드(현재 환율로 약 14500원 정도.....브렉시트 만세~)이다.

일반적으로 아두이노에 BLE모듈을 붙이거나 mbed 중에 BLE 지원 보드를 구입하는것보다 더 저렴하게  구입할 수 있는 BLE를 지원하는 프로세서 보드로 매력적이다.

mbed BLE Button example

BLE_Button은 BLE service 템플릿이다. 단순한 boolean 값에 대한 read-only characteristic을 처리한다. 입력 소스는 보드에 있는 푸쉬버튼이다. 버튼이 눌리거나 놓을 때 characteristic의 값을 바꿔 준다.

이 코드는 다음의 기능을 다룬다.

* Advertising 및 connection 설정
* Input characteristic 만들기 : read-only, boolean with notification
* Service class 구축 및 BLE 스택에 추가하기
* 서비스와 characteristic에 UUID 할당
* Characteristic의 값이 바뀔 때 notification을 푸쉬하기

Running the application

Requirements

이 샘플 어플리케이션은 스마트폰의 어떤 BLE 스캐너에서도 볼 수 있다. 폰에 스캐너 앱이 없으면 다음의 앱을 설치하면 된다

* nRF Master Control Panel for Android
* LightBlue for iPhone

하드웨어 요구사항은 main readme 를 참고하면 된다.

* 주의: 두개 이상의 mbed board를 가지고 있다면 (nrf51dk 또는 mkit) BLE_LED 와 BLE_LEDBlinker를 동시에 실행시킬 수 있다. 더 상세한 내용은 BLE_LEDBlinker 데모를 참고하면 된다.

Build Instructions

온라인 mbed 컴파일러에서 이 예제를 빌드하고 싶으면, 먼저 오른쪽의 'Import' 버튼을 사용해 예제를 import 해야 한다.

그 다음 빌드한 코드를 실행하려는 플랫폼을 선택해 준다. 플랫폼은 예를 들어 NRF51-DK 같이 BLE를 지원하는 플랫폼이거나 또는 다음의 목록에 있는 것 중 하나여야 한다.

BLE를 지원하는 플랫폼 목록

또는 예를 들어 K64F나 NUCLEO_F401RE같은 보드에 X-NUCLEO-IDB04A1를 추가하고 그 하드웨어에 적합한 BLE 드라이버를 포함하는 지원 라이브러리를 설치해 줘야만 한다.

일단 플랫폼을 선택하고 나면 예제를 컴파일 한 후 바이너리 파일을 보드에 넣어주면 된다.


Checking for success

주의: 아래의 스크린 캡춰는 안드로이드에서 nRF Master Control Panel 버젼 4.0.5를 사용해 얻은 것이다. 버젼이 다르거나 아이폰을 사용하는 경우 버튼의 위치나 화면 레이아웃이 다를 수 있다.

* 어플리케이션을 빌드한 후 바이너리 파일을 보드에 설치
* 스마트폰에서 BLE 스캐너 앱을 실행

 * 스캔을 시작


* 디바이스를 찾는다. 'Button'이라는 이름을 가지고 있어야 한다.


 * 디바이스와 connection을 설정한다.


* 디바이스의 service와 characteristic을 검색한다. *Button service*는 UUID '0xA000'을 가지고 있고 이 서비스는 UUID가 '0xA001'인 *Button state characteristic* 를 포함하고 있다. 사용하는 스캐너에 따라 비표준 16-bit UUID는 128-bit UUID로 표시될수도 있다. 만일 이런 경우라면 다음 포맷이 사용된다.
'0000XXXX-0000-1000-8000-00805F9B34FB' 에서 'XXXX' 부분에 16-bit UUID 값이 들어간다.


* button state characteristic의 notification을 등록한다. 그러면 버튼의 상태가 바뀔 때 마다 버튼의 새 상태를 포함한 notification을 자동으로 받게 된다.


* 보드의 버튼 1을 누르면 버튼의 상태가 업데이트 되고 스캐너로 notification을 보낸다. 버튼 characteristic 값의 새 상태는 0x01 이어야 한다.


* 보드의 버튼 1을 누른걸 떼면 버튼의 상태가 업데이트 되고 스캐너로 notification을 보낸다. 버튼 characteristic 값의 새 상태는 0x00 이어야 한다.


예제의 전체 소스코드는 아래 링크에서 BLE_Button 디렉토리를 보면 된다.

https://github.com/ARMmbed/mbed-os-example-ble

핵심 코드는 아래의 두 파일(ButtonService.h, main.coo)이다.

이 예제를 템플릿으로서 약간만 수정하면 동시에 여러개의 버튼 입력 또는 아날로그 센서값을 쉽게 받아올 수 있을 것이다.

ButtonService.h


/* mbed Microcontroller Library
 * Copyright (c) 2006-2013 ARM Limited
 *
 * Licensed under the Apache License, Version 2.0 (the "License");
 * you may not use this file except in compliance with the License.
 * You may obtain a copy of the License at
 *
 *     http://www.apache.org/licenses/LICENSE-2.0
 *
 * Unless required by applicable law or agreed to in writing, software
 * distributed under the License is distributed on an "AS IS" BASIS,
 * WITHOUT WARRANTIES OR CONDITIONS OF ANY KIND, either express or implied.
 * See the License for the specific language governing permissions and
 * limitations under the License.
 */

#ifndef __BLE_BUTTON_SERVICE_H__
#define __BLE_BUTTON_SERVICE_H__

class ButtonService {
public:
    const static uint16_t BUTTON_SERVICE_UUID              = 0xA000;
    const static uint16_t BUTTON_STATE_CHARACTERISTIC_UUID = 0xA001;

    ButtonService(BLE &_ble, bool buttonPressedInitial) :
        ble(_ble), buttonState(BUTTON_STATE_CHARACTERISTIC_UUID, &buttonPressedInitial, GattCharacteristic::BLE_GATT_CHAR_PROPERTIES_NOTIFY)
    {
        GattCharacteristic *charTable[] = {&buttonState};
        GattService         buttonService(ButtonService::BUTTON_SERVICE_UUID, charTable, sizeof(charTable) / sizeof(GattCharacteristic *));
        ble.gattServer().addService(buttonService);
    }

    void updateButtonState(bool newState) {
        ble.gattServer().write(buttonState.getValueHandle(), (uint8_t *)&newState, sizeof(bool));
    }

private:
    BLE                              &ble;
    ReadOnlyGattCharacteristic<bool>  buttonState;
};

#endif /* #ifndef __BLE_BUTTON_SERVICE_H__ */

--------------------------------------------

main.cpp

/* mbed Microcontroller Library
 * Copyright (c) 2006-2013 ARM Limited
 *
 * Licensed under the Apache License, Version 2.0 (the "License");
 * you may not use this file except in compliance with the License.
 * You may obtain a copy of the License at
 *
 *     http://www.apache.org/licenses/LICENSE-2.0
 *
 * Unless required by applicable law or agreed to in writing, software
 * distributed under the License is distributed on an "AS IS" BASIS,
 * WITHOUT WARRANTIES OR CONDITIONS OF ANY KIND, either express or implied.
 * See the License for the specific language governing permissions and
 * limitations under the License.
 */
#include <mbed-events/events.h>

#include <mbed.h>
#include "ble/BLE.h"
#include "ble/Gap.h"
#include "ButtonService.h"

DigitalOut  led1(LED1, 1);
InterruptIn button(BLE_BUTTON_PIN_NAME);

static EventQueue eventQueue(
    /* event count */ 10 * /* event size */ 32
);

const static char     DEVICE_NAME[] = "Button";
static const uint16_t uuid16_list[] = {ButtonService::BUTTON_SERVICE_UUID};

ButtonService *buttonServicePtr;

void buttonPressedCallback(void)
{
    eventQueue.post(Callback<void(bool)>(buttonServicePtr, &ButtonService::updateButtonState), true);
}

void buttonReleasedCallback(void)
{
    eventQueue.post(Callback<void(bool)>(buttonServicePtr, &ButtonService::updateButtonState), false);
}

void disconnectionCallback(const Gap::DisconnectionCallbackParams_t *params)
{
    BLE::Instance().gap().startAdvertising(); // restart advertising
}

void blinkCallback(void)
{
    led1 = !led1; /* Do blinky on LED1 to indicate system aliveness. */
}

void onBleInitError(BLE &ble, ble_error_t error)
{
    /* Initialization error handling should go here */
}

void bleInitComplete(BLE::InitializationCompleteCallbackContext *params)
{
    BLE&        ble   = params->ble;
    ble_error_t error = params->error;

    if (error != BLE_ERROR_NONE) {
        /* In case of error, forward the error handling to onBleInitError */
        onBleInitError(ble, error);
        return;
    }

    /* Ensure that it is the default instance of BLE */
    if(ble.getInstanceID() != BLE::DEFAULT_INSTANCE) {
        return;
    }

    ble.gap().onDisconnection(disconnectionCallback);

    button.fall(buttonPressedCallback);
    button.rise(buttonReleasedCallback);

    /* Setup primary service. */
    buttonServicePtr = new ButtonService(ble, false /* initial value for button pressed */);

    /* setup advertising */
    ble.gap().accumulateAdvertisingPayload(GapAdvertisingData::BREDR_NOT_SUPPORTED | GapAdvertisingData::LE_GENERAL_DISCOVERABLE);
    ble.gap().accumulateAdvertisingPayload(GapAdvertisingData::COMPLETE_LIST_16BIT_SERVICE_IDS, (uint8_t *)uuid16_list, sizeof(uuid16_list));
    ble.gap().accumulateAdvertisingPayload(GapAdvertisingData::COMPLETE_LOCAL_NAME, (uint8_t *)DEVICE_NAME, sizeof(DEVICE_NAME));
    ble.gap().setAdvertisingType(GapAdvertisingParams::ADV_CONNECTABLE_UNDIRECTED);
    ble.gap().setAdvertisingInterval(1000); /* 1000ms. */
    ble.gap().startAdvertising();
}

void scheduleBleEventsProcessing(BLE::OnEventsToProcessCallbackContext* context) {
    BLE &ble = BLE::Instance();
    eventQueue.post(Callback<void()>(&ble, &BLE::processEvents));
}

int main()
{
    eventQueue.post_every(500, blinkCallback);

    BLE &ble = BLE::Instance();
    ble.onEventsToProcess(scheduleBleEventsProcessing);
    ble.init(bleInitComplete);

    while (true) {
        eventQueue.dispatch();
    }

    return 0;
}


mbed BLE LED example

이 예제는 폰의 앱에서 BLE를 통해 LED의 on/off를 제어하기 위해 characteristic을 읽고 쓰는 코드이다.

이 코드는 다음의 기능을 다룬다.

* Advertising 및 connection 설정
* 서비스와 characteristic에 UUID 할당
* Input characteristic 만들기 : read/write, boolean. 이 characteristic으로 LED를 제어함
* Service class 구축 및 BLE 스택에 추가하기

Running the application

Requirements

이 샘플 어플리케이션은 스마트폰의 어떤 BLE 스캐너에서도 볼 수 있다. 폰에 스캐너 앱이 없으면 다음의 앱을 설치하면 된다

* nRF Master Control Panel for Android
* LightBlue for iPhone

하드웨어 요구사항은 main readme 를 참고하면 된다.

* 주의: 두개 이상의 mbed board를 가지고 있다면 (nrf51dk 또는 mkit) BLE_LED 와 BLE_LEDBlinker를 동시에 실행시킬 수 있다. 더 상세한 내용은 BLE_LEDBlinker 데모를 참고하면 된다.

Build Instructions


온라인 mbed 컴파일러에서 이 예제를 빌드하고 싶으면, 먼저 오른쪽의 'Import' 버튼을 사용해 예제를 import 해야 한다.

그 다음 빌드한 코드를 실행하려는 플랫폼을 선택해 준다. 플랫폼은 예를 들어 NRF51-DK 같이 BLE를 지원하는 플랫폼이거나 또는 다음의 목록에 있는 것 중 하나여야 한다.

BLE를 지원하는 플랫폼 목록

또는 예를 들어 K64F나 NUCLEO_F401RE같은 보드에 X-NUCLEO-IDB04A1를 추가하고 그 하드웨어에 적합한 BLE 드라이버를 포함하는 지원 라이브러리를 설치해 줘야만 한다.

일단 플랫폼을 선택하고 나면 예제를 컴파일 한 후 바이너리 파일을 보드에 넣어주면 된다.

Checking for success

주의: 아래의 스크린 캡춰는 안드로이드에서 nRF Master Control Panel 버젼 4.0.5를 사용해 얻은 것이다. 버젼이 다르거나 아이폰을 사용하는 경우 버튼의 위치나 화면 레이아웃이 다를 수 있다.

* 어플리케이션을 빌드한 후 바이너리 파일을 보드에 설치
* 스마트폰에서 BLE 스캐너 앱을 실행

* 스캔을 시작

* 디바이스를 찾는다. 'LED'라는 이름을 가지고 있어야 한다.

* 디바이스와 connection을 설정한다.

* 디바이스의 service와 characteristic을 검색한다. *LED service*는 UUID '0xA000'을 가지고 있고 이 서비스는 UUID가 '0xA001'인 *LED state characteristic* 를 포함하고 있다.

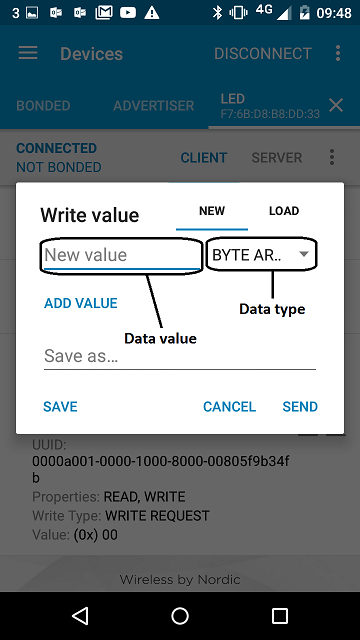
* *LED state* characteristic의 write 패널을 연다.

* 이 characteristic은 1 바이트 값을 허용한다.

* '0x01' : LED ON


* '0x00' : LED OFF

LED characteristic 값을 토글하면서 그 값에 따라 LED가 On/Off 되는걸 확인할 수 있다.

예제의 전체 소스코드는 아래 링크에서 BLE_LED 디렉토리를 보면 된다.

https://github.com/ARMmbed/mbed-os-example-ble

핵심 코드는 아래의 두 파일(LEDService.h, main.coo)이다.

이 예제를 템플릿으로 약간만 수정하면 동시에 여러개의 LED 또는 모터를 동시에 쉽게 제어할 수 있을 것이다.

LEDService.h


/* mbed Microcontroller Library
 * Copyright (c) 2006-2013 ARM Limited
 *
 * Licensed under the Apache License, Version 2.0 (the "License");
 * you may not use this file except in compliance with the License.
 * You may obtain a copy of the License at
 *
 *     http://www.apache.org/licenses/LICENSE-2.0
 *
 * Unless required by applicable law or agreed to in writing, software
 * distributed under the License is distributed on an "AS IS" BASIS,
 * WITHOUT WARRANTIES OR CONDITIONS OF ANY KIND, either express or implied.
 * See the License for the specific language governing permissions and
 * limitations under the License.
 */

#ifndef __BLE_LED_SERVICE_H__
#define __BLE_LED_SERVICE_H__

class LEDService {
public:
    const static uint16_t LED_SERVICE_UUID              = 0xA000;
    const static uint16_t LED_STATE_CHARACTERISTIC_UUID = 0xA001;

    LEDService(BLEDevice &_ble, bool initialValueForLEDCharacteristic) :
        ble(_ble), ledState(LED_STATE_CHARACTERISTIC_UUID, &initialValueForLEDCharacteristic)
    {
        GattCharacteristic *charTable[] = {&ledState};
        GattService         ledService(LED_SERVICE_UUID, charTable, sizeof(charTable) / sizeof(GattCharacteristic *));
        ble.addService(ledService);
    }

    GattAttribute::Handle_t getValueHandle() const
    {
        return ledState.getValueHandle();
    }

private:
    BLEDevice                         &ble;
    ReadWriteGattCharacteristic<bool> ledState;
};

#endif /* #ifndef __BLE_LED_SERVICE_H__ */ 
 
------------------------------------------------------

main.cpp

 
/* mbed Microcontroller Library
 * Copyright (c) 2006-2013 ARM Limited
 *
 * Licensed under the Apache License, Version 2.0 (the "License");
 * you may not use this file except in compliance with the License.
 * You may obtain a copy of the License at
 *
 *     http://www.apache.org/licenses/LICENSE-2.0
 *
 * Unless required by applicable law or agreed to in writing, software
 * distributed under the License is distributed on an "AS IS" BASIS,
 * WITHOUT WARRANTIES OR CONDITIONS OF ANY KIND, either express or implied.
 * See the License for the specific language governing permissions and
 * limitations under the License.
 */

#include <mbed-events/events.h>
#include <mbed.h>
#include "ble/BLE.h"
#include "LEDService.h"

DigitalOut alivenessLED(LED1, 0);
DigitalOut actuatedLED(LED2, 0);

const static char     DEVICE_NAME[] = "LED";
static const uint16_t uuid16_list[] = {LEDService::LED_SERVICE_UUID};

static EventQueue eventQueue(
    /* event count */ 10 * /* event size */ 32
);

LEDService *ledServicePtr;

void disconnectionCallback(const Gap::DisconnectionCallbackParams_t *params)
{
    (void) params;
    BLE::Instance().gap().startAdvertising();
}

void blinkCallback(void)
{
    alivenessLED = !alivenessLED; /* Do blinky on LED1 to indicate system aliveness. */
}

/**
 * This callback allows the LEDService to receive updates to the ledState Characteristic.
 *
 * @param[in] params
 *     Information about the characterisitc being updated.
 */
void onDataWrittenCallback(const GattWriteCallbackParams *params) {
    if ((params->handle == ledServicePtr->getValueHandle()) && (params->len == 1)) {
        actuatedLED = *(params->data);
    }
}

/**
 * This function is called when the ble initialization process has failled
 */
void onBleInitError(BLE &ble, ble_error_t error)
{
    /* Initialization error handling should go here */
}

/**
 * Callback triggered when the ble initialization process has finished
 */
void bleInitComplete(BLE::InitializationCompleteCallbackContext *params)
{
    BLE&        ble   = params->ble;
    ble_error_t error = params->error;

    if (error != BLE_ERROR_NONE) {
        /* In case of error, forward the error handling to onBleInitError */
        onBleInitError(ble, error);
        return;
    }

    /* Ensure that it is the default instance of BLE */
    if(ble.getInstanceID() != BLE::DEFAULT_INSTANCE) {
        return;
    }

    ble.gap().onDisconnection(disconnectionCallback);
    ble.gattServer().onDataWritten(onDataWrittenCallback);

    bool initialValueForLEDCharacteristic = false;
    ledServicePtr = new LEDService(ble, initialValueForLEDCharacteristic);

    /* setup advertising */
    ble.gap().accumulateAdvertisingPayload(GapAdvertisingData::BREDR_NOT_SUPPORTED | GapAdvertisingData::LE_GENERAL_DISCOVERABLE);
    ble.gap().accumulateAdvertisingPayload(GapAdvertisingData::COMPLETE_LIST_16BIT_SERVICE_IDS, (uint8_t *)uuid16_list, sizeof(uuid16_list));
    ble.gap().accumulateAdvertisingPayload(GapAdvertisingData::COMPLETE_LOCAL_NAME, (uint8_t *)DEVICE_NAME, sizeof(DEVICE_NAME));
    ble.gap().setAdvertisingType(GapAdvertisingParams::ADV_CONNECTABLE_UNDIRECTED);
    ble.gap().setAdvertisingInterval(1000); /* 1000ms. */
    ble.gap().startAdvertising();
}

void scheduleBleEventsProcessing(BLE::OnEventsToProcessCallbackContext* context) {
    BLE &ble = BLE::Instance();
    eventQueue.post(Callback<void()>(&ble, &BLE::processEvents));
}

int main()
{
    eventQueue.post_every(500, blinkCallback);

    BLE &ble = BLE::Instance();
    ble.onEventsToProcess(scheduleBleEventsProcessing);
    ble.init(bleInitComplete);

    while (true) {
        eventQueue.dispatch();
    }

    return 0;
} 


2016년 8월 9일 화요일

mbed RTOS

Overview


mbed RTOS는 사실 Keil RTX 코드의 C++ wrapper이다. Keil RTX에 관한 더 상세한 내용은 the Keil CMSIS-RTOS tutorialthe element14 introduction to Keil RTX 를 참고하면 된다. 이 자료들은 RTOS의 일반적인 원리를 소개하는데에도 사용될 수 있다. 이 가이드를 이해하기 위해서는 RTOS의 기본 컨셉에 익숙해지는게 중요하다.

mbed RTOS 코드는 mbed-os repository 의 rtos/rtos 서브디렉토리에서 찾을 수 있다.

Thread 

Thread 클래스는 시스템에서 스레드를 정의, 생성, 제어 할 수 있게 해 준다.

Thread는 다음의 상태를 가질 수 있다.


* Running: 현재 실행중인 스레드. 한번에 한개의 스레드만 이 상태에 있을 수 있음
* Ready: 실행할 준비가 된 스레드. 일단 running 스레드가 terminated 되거나 또는 waiting이 되면 ready 스레드들 중에 가장 높은 우선순위를 가진 스레드가 running 스레드가 됨
* Waiting: 이벤트가 발생하기를 기다리는 스레드
* Inactive: 만들어지지 않았거나 terminate된 스레드. 이 스레드들은 일반적으로 시스템 자원을 소비하지 않음

main() 함수


main 함수는 특별한 스레드 함수로 시스템 초기화시에 시작되고 최초 우선순위는 osPriorityNormal 이 된다. RTOS에 의해 가장 먼저 시작되는 스레드이다.


Thread example


아래 코드는 두개의 LED를 깜빡이기 위해 두개의 스레드를 사용한다. 첫번째 스레드는 자동으로 만들어져 main 함수를 실행한다. 두번째 스레드는 main 함수 안에서 명시적으로 만들어진다.


main.cpp

#include "mbed.h"
#include "rtos.h"

DigitalOut led1(LED1);
DigitalOut led2(LED2);

void led2_thread(void const *args) {
    while (true) {
        led2 = !led2;
        Thread::wait(1000);
    }
}

int main() {
    Thread thread(led2_thread);
   
    while (true) {
        led1 = !led1;
        Thread::wait(500);
    }
}
#include "mbed.h"
#include "rtos.h"

DigitalOut led1(LED1);
DigitalOut led2(LED2);

void led2_thread(void const *args) {
    while (true) {
        led2 = !led2;
        Thread::wait(1000);
    }
}

int main() {
    Thread thread(led2_thread);
   
    while (true) {
        led1 = !led1;
        Thread::wait(500);
    }
}


MUTEX

Mutex는 스레드들의 실행시 동기화를 위해 사용된다. 예를 들어 공유 자원에 동시에 억세스 하는걸 막기 위해 사용할 수 있다.

* 경고: ISR
현재 버젼의 mbed OS에서 Mutex 메소드는 ISR(Interrupt Service Routine)에서 호출될 수 없다. 만일 ISR 내에서 mutex를 사용하기 위해 시도하면 아무것도 일어나지 않는다. mutex를 lock하려고 시도하면 lock이 실제로 lock되어 있는지 아니면 사용 가능한지 여부에 상관 없이 곧바로 lock이 성공한다. 즉 ISR내에서 mutex lock을 얻으면 스레드 동기화 메커니즘을 깨 버리게 되어 정상적인 경우 안전한 코드가 비정상적으로 동작하게 된다. 차후 버젼의 mbed OS에서는 warning을 주고, 최종적으로는 이런 일이 발생하는걸 금지시킬 것이다.


Mutex example

printf()를 보호하기 위해 Mutex를 사용

main.cpp

#include "mbed.h"
#include "rtos.h"

Mutex stdio_mutex;

void notify(const char* name, int state) {
    stdio_mutex.lock();
    printf("%s: %d\n\r", name, state);
    stdio_mutex.unlock();
}

void test_thread(void const *args) {
    while (true) {
        notify((const char*)args, 0); Thread::wait(1000);
        notify((const char*)args, 1); Thread::wait(1000);
    }
}

int main() {
    Thread t2(test_thread, (void *)"Th 2");
    Thread t3(test_thread, (void *)"Th 3");
   
    test_thread((void *)"Th 1");
}
#include "mbed.h"
#include "rtos.h"

Mutex stdio_mutex;

void notify(const char* name, int state) {
    stdio_mutex.lock();
    printf("%s: %d\n\r", name, state);
    stdio_mutex.unlock();
}

void test_thread(void const *args) {
    while (true) {
        notify((const char*)args, 0); Thread::wait(1000);
        notify((const char*)args, 1); Thread::wait(1000);
    }
}

int main() {
    Thread t2(test_thread, (void *)"Th 2");
    Thread t3(test_thread, (void *)"Th 3");
   
    test_thread((void *)"Th 1");
}


* 주의 : C standard library Mutex
ARM 표준 라이브러리는 이미 stdio에 대한 억세스를 보호하기 위해 mutex를 사용하고 있다. 그러므로 LPC1768에서 위의 예제는 필요 없다. 하지만 LPC11U24의 경우는 디폴트로 stdio mutex를 지원하지 않기 때문에 위의 예제가 필요하게 된다.

* 경고 : ISR 내에서 stdio, malloc, new
ARM C standard library의 mutex 때문에 ISR내에서는 stdio(printf, putc, getc 등), malloc, new를 사용할 수 없다.

Semaphore


Semaphore는 스레드들이 특정 타입의 공유자원 풀에 억세스 하는걸 관리한다.


main.cpp

#include "mbed.h"
#include "rtos.h"

Semaphore two_slots(2);

void test_thread(void const *name) {
    while (true) {
        two_slots.wait();
        printf("%s\n\r", (const char*)name);
        Thread::wait(1000);
        two_slots.release();
    }
}

int main (void) {
    Thread t2(test_thread, (void *)"Th 2");
    Thread t3(test_thread, (void *)"Th 3");
   
    test_thread((void *)"Th 1");
}
#include "mbed.h"
#include "rtos.h"

Semaphore two_slots(2);

void test_thread(void const *name) {
    while (true) {
        two_slots.wait();
        printf("%s\n\r", (const char*)name);
        Thread::wait(1000);
        two_slots.release();
    }
}

int main (void) {
    Thread t2(test_thread, (void *)"Th 2");
    Thread t3(test_thread, (void *)"Th 3");
   
    test_thread((void *)"Th 1");


Signals


각 스레드는 시그널을 기다리고 이벤트 발생을 통보할 수 있다.

main.cpp

#include "mbed.h"
#include "rtos.h"

DigitalOut led(LED1);

void led_thread(void const *argument) {
    while (true) {
        // Signal flags that are reported as event are automatically cleared.
        Thread::signal_wait(0x1);
        led = !led;
    }
}

int main (void) {
    Thread thread(led_thread);
   
    while (true) {
        Thread::wait(1000);
        thread.signal_set(0x1);
    }
}


Queue and MemoryPool

Queue


Queue는 생산자 스레드가 소비자 스레드에게 보낼 데이터에 대한 포인터를 큐에 집어넣을 수 있게 해 준다.

Queue queue;

message_t *message;

queue.put(message);

osEvent evt = queue.get();
if (evt.status == osEventMessage) {
    message_t *message = (message_t*)evt.value.p;Queue queue;

message_t *message;

queue.put(message);

osEvent evt = queue.get();
if (evt.status == osEventMessage) {
    message_t *message = (message_t*)evt.value.p;


MemoryPool


MemoryPool 클래스는 고정된 크기의 메모리 풀을 정의하고 관리하는데 사용된다.

MemoryPool mpool;

message_t *message = mpool.alloc();

mpool.free(message);MemoryPool mpool;

message_t *message = mpool.alloc();

mpool.free(message);


Queue and MemoryPool example


#include "mbed.h"
#include "rtos.h"

typedef struct {
    float    voltage;   /* AD result of measured voltage */
    float    current;   /* AD result of measured current */
    uint32_t counter;   /* A counter value               */
} message_t;

MemoryPool<message_t, 16> mpool;
Queue<message_t, 16> queue;

/* Send Thread */
void send_thread (void const *args) {
    uint32_t i = 0;
    while (true) {
        i++; // fake data update
        message_t *message = mpool.alloc();
        message->voltage = (i * 0.1) * 33;
        message->current = (i * 0.1) * 11;
        message->counter = i;
        queue.put(message);
        Thread::wait(1000);
    }
}

int main (void) {
    Thread thread(send_thread);
   
    while (true) {
        osEvent evt = queue.get();
        if (evt.status == osEventMessage) {
            message_t *message = (message_t*)evt.value.p;
            printf("\nVoltage: %.2f V\n\r"   , message->voltage);
            printf("Current: %.2f A\n\r"     , message->current);
            printf("Number of cycles: %u\n\r", message->counter);
           
            mpool.free(message);
        }
    }
}

Mail


Mail은 Queue와 같은 식으로 동작하지만 메시지를 넣기 위한 메모리 풀을 할당해준다.


Mail example


main.cpp

#include "mbed.h"
#include "rtos.h"

/* Mail */
typedef struct {
  float    voltage; /* AD result of measured voltage */
  float    current; /* AD result of measured current */
  uint32_t counter; /* A counter value               */
} mail_t;

Mail<mail_t, 16> mail_box;

void send_thread (void const *args) {
    uint32_t i = 0;
    while (true) {
        i++; // fake data update
        mail_t *mail = mail_box.alloc();
        mail->voltage = (i * 0.1) * 33;
        mail->current = (i * 0.1) * 11;
        mail->counter = i;
        mail_box.put(mail);
        Thread::wait(1000);
    }
}

int main (void) {
    Thread thread(send_thread);
   
    while (true) {
        osEvent evt = mail_box.get();
        if (evt.status == osEventMail) {
            mail_t *mail = (mail_t*)evt.value.p;
            printf("\nVoltage: %.2f V\n\r"   , mail->voltage);
            printf("Current: %.2f A\n\r"     , mail->current);
            printf("Number of cycles: %u\n\r", mail->counter);
           
            mail_box.free(mail);
        }
    }
}


RtosTimer


시스템에서 타이머 함수를 만들거나 제어하기 위해 RtosTimer 클래스를 사용할 수 있다. Period가 expire되면 타이머 함수가 호출되므로 one-shot 또는 주기적으로 호출되도록 할 수 있다. 타이머는 시작, 재시작, 정지될 수 있다.

타이머는 osTimerThread 스레드에서 처리된다. 콜백함수는 이 스레드 하에서 실행되고 CMSIS-RTOS API 콜을 사용할 수도 있다.


RtosTimer example


4개의 LED 타이밍을 제어

main.cpp

#include "mbed.h"
#include "rtos.h"

DigitalOut LEDs[4] = {
    DigitalOut(LED1), DigitalOut(LED2), DigitalOut(LED3), DigitalOut(LED4)
};

void blink(void const *n) {
    LEDs[(int)n] = !LEDs[(int)n];
}

int main(void) {
    RtosTimer led_1_timer(blink, osTimerPeriodic, (void *)0);
    RtosTimer led_2_timer(blink, osTimerPeriodic, (void *)1);
    RtosTimer led_3_timer(blink, osTimerPeriodic, (void *)2);
    RtosTimer led_4_timer(blink, osTimerPeriodic, (void *)3);
   
    led_1_timer.start(2000);
    led_2_timer.start(1000);
    led_3_timer.start(500);
    led_4_timer.start(250);
   
    Thread::wait(osWaitForever);
}#include "mbed.h"
#include "rtos.h"

DigitalOut LEDs[4] = {
    DigitalOut(LED1), DigitalOut(LED2), DigitalOut(LED3), DigitalOut(LED4)
};

void blink(void const *n) {
    LEDs[(int)n] = !LEDs[(int)n];
}

int main(void) {
    RtosTimer led_1_timer(blink, osTimerPeriodic, (void *)0);
    RtosTimer led_2_timer(blink, osTimerPeriodic, (void *)1);
    RtosTimer led_3_timer(blink, osTimerPeriodic, (void *)2);
    RtosTimer led_4_timer(blink, osTimerPeriodic, (void *)3);
   
    led_1_timer.start(2000);
    led_2_timer.start(1000);
    led_3_timer.start(500);
    led_4_timer.start(250);
   
    Thread::wait(osWaitForever);
}


Interrupt Service Routine


ISR에서도 동일한 RTOS API를 사용할 수 있다. 단 두가지 주의할 점은 다음과 같다.

* Mutex를 사용할 수 없다.
* ISR내에서는 wait이 허용되지 않는다. 메소드 파라미터의 모든 timeout은 0으로 설정되어야만 한다.

ISR example


Interrupt를 발생시키기 위해 큐의 메시지를 사용

main.cpp

#include "mbed.h"
#include "rtos.h"

Queue<uint32_t, 5> queue;

DigitalOut myled(LED1);

void queue_isr() {
    queue.put((uint32_t*)2);
    myled = !myled;
}

void queue_thread(void const *args) {
    while (true) {
        queue.put((uint32_t*)1);
        Thread::wait(1000);
    }
}

int main (void) {
    Thread thread(queue_thread);
   
    Ticker ticker;
    ticker.attach(queue_isr, 1.0);
   
    while (true) {
        osEvent evt = queue.get();
        if (evt.status != osEventMessage) {
            printf("queue->get() returned %02x status\n\r", evt.status);
        } else {
            printf("queue->get() returned %d\n\r", evt.value.v);
        }
    }
}


Default Timeout


mbed RTOS API는 기본적으로 producer 메소드는 0 timeout(no wait)을, consumer 메소드는 osWaitForever(infinite wait)을 사용한다.

Producer의 일반적인 시나리오는 이벤트 발생을 통보하기 위해 인터럽트를 발생시키는 주변기기가 될 수 있다. 그에 해당하는 ISR은 기다릴 수가 없다. (기다리면 시스템 전체가 데드락이 걸릴수도 있음) 반면 consumer는 이벤트를 기다리는 백그라운드 스레드가 될 수 있다. 이 경우 바람직한 기본 행동은 이벤트가 발생할 때 까지는 CPU 사이클을 사용하지 않는 것이므로 osWaitForever가 된다.

* 주의 : ISR에서의 no wait
ISR에서 RTOS 오브젝트 메소드를 호출할 때 모든 timeout 라파미터는 0(no wait)이 되어야만 한다. ISR 내에서 wait은 허용되지 않는다.

Status and error code


CMSIS-RTOS 함수는 다음과 같은 상태값을 리턴한다.

* osOK: 함수 완료. 이벤트가 발생하지 않았음
* osEventSignal : 함수 완료. 시그널 이벤트 발생
* osEventMessage : 함수 완료. 메시지 이벤트 발생
* osEventMail : 함수 완료. 메일 이벤트 발생
* osEventTimeout : 함수 완료. 타임아웃 발생
* osErrorParameter : 필수 파라미터가 없거나 잘못된 오브젝트를 지정
* osErrorResource : 지정된 리소스를 사용할 수 없음
* osErrorTimeoutResource : 지정된 리소스가 타임아웃 시간동안 사용할 수 없음
* osErrorISR : 함수는 ISR에서 호출될 수 없음
* osErrorISRRecursive : ISR에서 함수가 같은 오브젝트에 대해 반복적으로 호출됨
* osErrorPriority : 시스템이 우선순위를 정할 수 없거나 스레드가 허용되지 않는 우선순위를 가지고 있음
* osErrorNoMemory : 시스템의 메모리 부족. 동작을 수행하기 위한 메모리 할당이나 예약이 불가능
* osErrorValue : 파라미터 값이 범위를 벗어남
* osErrorOS : 지정되지 않은 RTOS 에러 - 런타임 에러지만 다른 에러 메시지에 해당하지 않는 경우

API - RTOS header


rtos.h 

/* mbed Microcontroller Library

  * Copyright (c) 2006-2012 ARM Limited
  *
  * Permission is hereby granted, free of charge, to any person obtaining a copy
  * of this software and associated documentation files (the "Software"), to deal
  * in the Software without restriction, including without limitation the rights
  * to use, copy, modify, merge, publish, distribute, sublicense, and/or sell
  * copies of the Software, and to permit persons to whom the Software is
  * furnished to do so, subject to the following conditions:
  *
  * The above copyright notice and this permission notice shall be included in
  * all copies or substantial portions of the Software.
  *
  * THE SOFTWARE IS PROVIDED "AS IS", WITHOUT WARRANTY OF ANY KIND, EXPRESS OR
  * IMPLIED, INCLUDING BUT NOT LIMITED TO THE WARRANTIES OF MERCHANTABILITY,
  * FITNESS FOR A PARTICULAR PURPOSE AND NONINFRINGEMENT. IN NO EVENT SHALL THE
  * AUTHORS OR COPYRIGHT HOLDERS BE LIABLE FOR ANY CLAIM, DAMAGES OR OTHER
  * LIABILITY, WHETHER IN AN ACTION OF CONTRACT, TORT OR OTHERWISE, ARISING FROM,
  * OUT OF OR IN CONNECTION WITH THE SOFTWARE OR THE USE OR OTHER DEALINGS IN THE
  * SOFTWARE.
  */
 #ifndef RTOS_H
 #define RTOS_H

 #include "Thread.h"
 #include "Mutex.h"
 #include "RtosTimer.h"
 #include "Semaphore.h"
 #include "Mail.h"
 #include "MemoryPool.h"
 #include "Queue.h"

 using namespace rtos;

 /* Get mbed lib version number, as RTOS depends on mbed lib features
  like mbed_error, Callback and others.
 */
 #include "mbed.h"

 #if (MBED_LIBRARY_VERSION < 122)
 #error "This version of RTOS requires mbed library version > 121"
 #endif

 #endif


mbed CLI로 프로그램 컴파일하기 (Compile code using mbed CLI)

mbed OS 5가 나오면서 스레드 지원이 native로 되어 main()  스레드에 진입하기 전에 RTOS가 먼저 초기화 되게 되었다. 또한 CLI 툴을 지원해 이제 온라인 컴파일러 없이 command line에서 빌드가 가능해졌다.

임베디드 보드에서의 hello world인 LED blink를 CLI를 통해 빌드하는걸 보도록 하겠다.

코드는 다음과 같다.


#include "mbed.h"
#include "rtos.h"

DigitalOut led1(LED1);

// main() runs in its own thread in the OS
// (note the calls to Thread::wait below for delays)
int main() {
    while (true) {
        led1 = !led1;
        Thread::wait(500);
    }
}


mbed CLI 와 툴체인 설치하기

 
mbed CLI는 오프라인 툴이기 때문에 작업을 시작하기 전에 먼저 설치해 줘야만 한다. 또한 툴체인도 설치해 줘야 한다. 
mbed CLI는 맥, 윈도우, 리눅스에서 모두 사용할 수 있다. CLI를  설치하기 위해서는 몇가지 먼저 설치해 줘야 하는 프로그램들이 있다.
Requirements

* Python - mbed CLI는 파이선 스크립트이기 때문에 파이선이 설치되어 있어야만 한다. mbed CLI는 파이선 버젼 2.7에서 테스트 되었다.
* Git and Mercurial - mbed CLI는 Git과 Mercurial을 모두 지원한다. 그러므로 둘 다 설치할 필요가 있다.
* 컴파일러와 툴체인 - 컴파일러를 포함한 툴체인을 설치해 줘야 한다. mbed OS 5는 GCC ARM toolchain, ARM Compiler 5, IAR 컴파일러를 모두 지원한다. 이 세가지 중에 하나를 골라 설치해 주면 된다.

Installing mbed CLI


mbed CLI는 pip를 사용해 설치할 수 있다. 
 
$ pip install mbed-cli

Creating and importing programs


mbed CLI는 프로그램을 만들거나 mbed OS 2 또는 mbed OS 5 기반의 프로그램을 import 할 수 있다.

Creating a new program for mbed OS 5

새 프로그램을 만들 때 mbed CLI 는 자동으로 최신 mbed OS 릴리즈를 import 한다. 각 릴리즈는 code, build tool, desktop IDE project generator 같은 모든 컴포넌트를 포함한다.

이제 'mbed-os-program' 이라는 새 프로그램을 만들어 보겠다. 

$ mbed new mbed-os-program
[mbed] Creating new program "mbed-os-program" (git)
[mbed] Adding library "mbed-os" from "https://github.com/ARMmbed/mbed-os" at latest revision in the current branch
[mbed] Updating reference "mbed-os" -> "https://github.com/ARMmbed/mbed-os/#89962277c20729504d1d6c95250fbd36ea5f4a2d"
 

'mbed-os-program'이라는 새 폴더를 만들어 새 repository를 초기화하고 최신 리비젼의 mbed-os dependency를 프로그램 트리에 import한다.

mbed ls 명령으로 프로그램에 import된 모든 라이브러리를 볼 수 있다.
 

$ cd mbed-os-program$ mbed ls -a
mbed-os-program (mbed-os-program)
`- mbed-os (https://github.com/ARMmbed/mbed-os#9962277c207)

Adding libraries


코드를 작성하는 동안 어플리케이션에 다른 라이브러리를 추가할 필요가 있을수 있다. mbed add 명령으로 라이브러리를 추가할 수 있다.  

$ mbed add https://developer.mbed.org/users/wim/code/TextLCD/

URL#hash 포맷으로 라이브러리의 특정 리비젼을 추가할 수 있다. 
 
$ mbed add https://developer.mbed.org/users/wim/code/TextLCD/#e5a0dcb43ecc 
 

Specifying a destination directory


라이브러리를 특정 디렉토리에 추가하고 싶으면 add 명령 뒤쪽에 디렉토리 이름을 추가 파라미터로 넘겨줄 수 있다.  

$ mbed add https://developer.mbed.org/users/wim/code/TextLCD/ text-lcd

mbed CLI에서 이 기능을 지원하기는 하지만 가능하면 쓰지 않기를 권장한다. 소스 리포지토리와 다른 이름의 디렉토리에 라이브러리를 추가하는건 혼란을 불러 일으킬 수 있다.
 

Compiling code


먼저 mbed CLI에 컴파일러와 툴체인의 위치를 알려줘야 한다. 여기서는 GCC ARM 을 사용하겠다. 
 
$ mbed config --global GCC_ARM_PATH /usr/local/gcc-arm-none-eabi/bin
 
위에서 빨간색 부분은 자신의 환경에 맞게 바꿔줘야 한다. arm-none-eabi-gcc 실행파일이 들어있는 디렉토리 이름을 써 주면 된다.
이 명령은 최초에 한번만 해 주면 된다.

mbed config --list 명령으로 현재 설정된 내용을 확인해 볼 수 있다.
 
$ mbed config --list
[mbed] Global config:
No global configuration is set

[mbed] Local config (/Users/****/tmp/mbed/mbed-os-program):
GCC_ARM_PATH=/usr/local/gcc-arm-none-eabi/bin
TOOLCHAIN=GCC_ARM
TARGET=K64F
$


Compiling your program


이제 mbed compile 명령으로 코드를 컴파일 할 수 있다.

물론 위에서 mbed new 명령으로 프로그램 폴더가 만들어 졌지만 아직 자신의 코드는 하나도 들어있지 않다. 그러므로 mbed-os-program 디렉토리에 main.cpp 파일을 만들어 맨 위쪽의 코드를 넣고 저장해 준다.
그리고 난 후 mbed compile 명령을 내리면 빌드가 끝나 보드에 넣어줄 수 있는 .bin 파일이 생성된다.
   

$ vi main.cpp

프로그램 코드를 입력한 후 저장하고 종료

$ mbed compile -t GCC_ARM -m K64F
Building project mbed-os-pgm (K64F, GCC_ARM)
Scan: .
Scan: FEATURE_BLE
...
Link: mbed-os-program

Elf2Bin: mbed-os-program

 +---------------------+-------+-------+------+
| Module              | .text | .data | .bss |
+---------------------+-------+-------+------+
| Fill                |   164 |     4 | 2313 |
| Misc                | 37733 |  2224 |  120 |
| features/frameworks |  3288 |    52 |  328 |
| hal/common          |  2435 |     4 |  269 |
| hal/targets         | 12108 |    12 |  200 |
| rtos/rtos           |    22 |     4 |    0 |
| rtos/rtx            |  5713 |    20 | 2682 |
| Subtotals           | 61463 |  2320 | 5912 |
+---------------------+-------+-------+------+
Allocated Heap: 65536 bytes
Allocated Stack: 32768 bytes
Total Static RAM memory (data + bss): 8232 bytes
Total RAM memory (data + bss + heap + stack): 106536 bytes
Total Flash memory (text + data + misc): 64823 bytes
Image: ./.build/K64F/GCC_ARM/mbed-os-program.bin

$
 
위의 명령에서 -m 옵션은 타겟 시스템을 지정하는 것이고 -t 옵션은 컴파일러와 툴체인을 지정하는 것인데 여기서는 GCC ARM을 사용하기 때문에 GCC_ARM 을 써 줬다.  

$ cd .build/K64F/GCC_ARM/
$ ls
total 2840
  16 main.d       128 mbed-os-program.bin*      8 mbed-os-program_map.csv    16 test_env.d
   8 main.o      400 mbed-os-program.elf*      8 mbed-os-program_map.json   16 test_env.o
   0 mbed-os/     2232 mbed-os-program.map       8 mbed_config.h
$
 
위에서 볼 수 있는것처럼 컴파일 된 바이너리와 elf image등은 .build 디렉토리 아래에 들어있다. 즉 저기서 mbed-os-program.bin 파일을 보드에 넣어주면 되는 것이다.

2016년 7월 21일 목요일

Firmata를 사용해 라즈베리 파이에서 아두이노 제어하기 (Controlling Arduino from Raspberry Py using Firmata)


아두이노와 라즈베리 파이를 시리얼 포트롤 통해 연결하면 firmata를 사용해 라즈베리 파이에서 아두이노의 핀들을 제어할 수 있다. 아두이노와 라즈베리 파이를 시리얼 포트로 연결하는 방법은 이전 포스트(라즈베리 파이와 아두이노를 시리얼 포트로 연결하는 방법들 )를 참고하면 된다.

먼저 아두이노를 설정 해 준다.

Firmata를 사용해 라즈베리 파이에서 아두이노를 제어하려면 아두이노에도 firmata 소프트웨어가 설치되어 있어야 한다.

메뉴의 File -> Examples -> Firmata 에서 StandardFirmata를 오픈해 자신이 사용하는 아두이노에 업로드 해 주면 된다.

다음은 라즈베리 파이에 pyfirmata를 설치해야 한다.

터미널 창에서 아래의 명령을 입력해 주면 된다. 기존에 이미 pip와 pyserial이 설치되어 있다면 첫번째 줄은 건너 뛰어도 된다.

$ sudo apt-get install python-pip python-serial
$ sudo pip install pyfirmata

이제 아두이노를 USB케이블을 사용해 라즈베리 파이에 연결해 주면 /dev 디렉토리에 ttyUSB0 디바이스가 만들어진다. 이 디바이스 이름을 알고 있어야 한다.

만일 라즈베리 파이에 허브를 연결한 다음 여러대의 아두이노를 연결해 주면 각각 /dev/ttyUSB0, /dev/ttyUSB1, /dev/ttyUSB2, .... 식으로 이름이 부여된다.

이제 실제로 라즈베리 파이와 아두이노를 firmata를 사용해 연결해 준다.

$ python
Python 2.7.3 (default, Mar 18 2014, 05:13:23)
[GCC 4.6.3] on linux2
Type "help", "copyright", "credits" or "license" for more information.
>>> from pyfirmata import Arduino, util

>>> board = Arduino('/dev/ttyUSB0')
>>>

위와 같이 에러가 없이 진행되었다면 연결이 성공한 것이다.

이제 아두이노의 디지털 포트는 board.digital[] 리스트를 사용해 제어할 수 있다.

즉 13번핀의 LED를 on/off하고 싶으면 다음과 같이 하면 된다.

>>> board.digital[13].write(1)
>>> board.digital[13].write(0)
>>>

핀의 상태를 읽을 때는 다음과 같다.

>>> print board.digital[3].read()
 0
>>>

그런데 핀을 반복적으로 사용해야 하는 경우 매번 board.digital[...] 이렇게 쓰는건 귀찮다. 그 대신 board.get_pin() 함수를 사용해 핀의 reference를 얻어 올 수 있다. 함수의 파라미터 부분에 "[a|d]:[pin#]:[i:o:p:s]" 형태의 스트링을 넘겨줘야 하는데 파라미터는 3개의섹션으로 되어 있고 각 섹션은 콜론(':')으로 구분한다.

첫번째 섹션은 핀이 아날로그(a)인지 디지털(d)인지를 지정한다. 두번째 섹션은 사용할 핀 번호가 된다. 즉 아두이노 우노의 경우 아날로그면 0~5, 디지털이면 0~13 사이의 값이 올 수 있다. 세번째 섹션은 핀 모드를 설정한다. 'i'면 입력, 'o'면 출력, 'p'면 PWM, 's'면 서보가 된다.

이 함수의 리턴값을 변수에 넣어 추후 read, write에 사용하면 된다.

>>> pin13 = board.get_pin('d:13:o')
>>> pin13.write(1)
>>>
>>> pin2 = board.get_pin('d:2:i')
>>> pin2.read()
0
>>>

아날로그 핀에서 값을 읽을 때는 먼저 analog value reporting을 활성화 시켜줘야만 한다. 하지만 그렇게 하면 아두이노가 라즈베리 파이에게 지속적으로 값을 보내게 된다. 라즈베리 파이에서 값을 계속 읽어내지 않으면 시리얼 통신을 막아버려 스크립트가 정상적으로 동작하지 못하게 만들어 버린다. 그러므로 정상적으로 값을 읽기 위해서는 iterator 스레드를 사용하는 것이 유용하다.

>>> it = util.Iterator(board)
>>> it.start()
>>> board.analog[0].enable_reporting()
>>> board.analog[0].read()
>>> it.start()
>>>

아날로그 값 리포팅을 멈추게 하려면 disable_reporting() 메소드를 호출하면 된다.


2014년 10월 11일 토요일

mbed 시작하기

http://www.mbed.org 사이트에 접속


우측 상단의 Developer Site 를 클릭


 우측 상단의 Login or signup을 클릭


Signup 을 선택해서 어카운트를 생성


로그인 한 후 우측 상단의 Compiler를 클릭


자신이 가지고 있는 디바이스를 선택해야 함. 우측 상단의 'No device selected'를 클릭


'Add a device' 를 클릭


mbed 호환 플랫폼 목록이 나오고 이 중에 자신이 가지고 있는 보드를 선택


보드를 선택하면 브라우저에 해당 보드에 대한 자세한 설명이 나옴. 'Add to your mbed Compiler'를 클릭


플랫폼이 추가되었음. 추가한 플랫폼을 선택하고 'Select Platform'을 클릭


우측 상단에서 방금 선택한 플랫폼 이름을 볼 수 있음. 좌측 상단의 'New'를 클릭


새 프로젝트 생성을 위한 윈도우가 열림. 'OK'를 클릭


'main.cpp'를 클릭하면 우측에 소스코드가 나타남


'Compile' 버튼을 클릭해서 프로그램을 컴파일


에러 없이 컴파일이 정상적으로 끝나면 실행 가능한 바이너리 파일이 자동으로 다운로드 됨. 파일 이름은 [프로그램 이름]+'_'+[플랫폼 이름]+'.bin'이 됨. 여기서 프로그램 이름이 'mbed_blinky'이고 플랫폼이 'LPC1768'이므로 파일 이름이 'mbed_blinky_LPC1768.bin'임

보드를 PC에 연결하면 보드는 외장하드로 인식됨


다운로드 된 바이너리 파일을 드래그해서 외장하드로 복사함. 복사가 완료되면 보드의 RESET 버튼을 눌러주면 바이너리 파일이 보드의 플래쉬에 기록되고 나서 바로 실행됨